Bracing the Back & Gluing in the Blocks


Wednesday, July 9th, 2008:

Here was my job list for today:

  • Glue in the neck block and shape it to the cutaway side.
  • Shape the back braces.
  • Make spreaders for the cutaway side.
  • Start work on the rosette.

Well, I only managed to get the first three items done. I can't believe how LONG it takes me to do some things, things I think should only take a little while!!! I spent almost twelve hours working today on those three tasks.

First, after sanding the cutaway curve on the side of the neck block, I glued it to the side set with epoxy.

As that was setting up, I shaped and sanded the back braces.


  [ NOTE: I have since replaced the top brace in this photo with one that extends all the way across the upper bout. Look here for the explanation. ]  


INDEX:

Return to HOME PAGE

  1. A Little Detour....A Tour of My Workroom!!!
  2. Joining the Top
  3. Starting to Bend
  4. Bending, Day 2
  5. Bending, Day 3
  6. Neck Block, Center Strip, Cutaway!
  7. Bracing the Back, Gluing in the Blocks
  8. Shape Back Braces, Glue Neck Block, Make Spreaders
  9. Spreader, Rim, Kerfing
  10. Rim-Sanding, Brace-Shaping, Go-Bar Modification, & Obon!!!
  11. Side Strips & Rosette
  12. Beginning the Top Bracing
  13. Bracing, Continued...
  14. Gluing the Back
  15. Gluing the Top
  16. Trimming the Overhang
  17. Routing for Binding : Day 1
  18. Routing for Binding : Day 2
  19. Fitting & Gluing the Bindings
  20. The Soundbox is Done!!!
  21. Truss Rod Slot, Peghead Veneer
  22. Peghead, Start Heel
  23. Threaded Inserts, Neck Trimmed
  24. Fitting the Neck!!!
  25. Truss Rod Cavity, Heel Cap, Fingerboard Trimmed
  26. Finishing and Gluing the Fingerboard / Peghead Inlay
  27. Carving the Neck
  28. I Feel Good....The Basic Building is Done!!! (Now on to the Finishing....)
  29. Pore-Filling
  30. Sealing
  31. Finish Coats
  32. Finishing the Finish!!!
  33. Gluing the Bridge
  34. It's All Done!!!


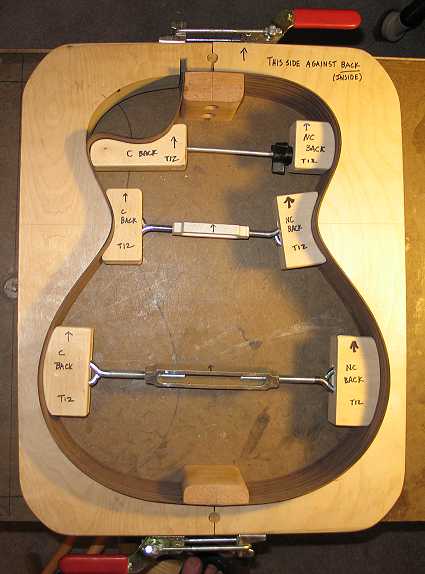
Then, what took me the longest time was deciding what to do about spreaders. In a previous guitar (the classical), I had not kept the spreaders in after I had closed the soundbox up; as a result, I had sides that were out of parallel with each other, and a corresponding difficulty with routing the binding channels accurately.

I didn't want that to happen again. I wanted to make sure my sides were tightly against the mold at all points. I also wanted to make sure the spreaders wouldn't interfere with each other and could be easily removed from the soundbox through the soundhole. It took me a while to figure out what to do about the upper bout, as the cutaway horn was opposite the non-cutaway upper bout block.

Originally, I had wanted a spreader to hold the neck and tail blocks tight, and was considering doing one of those spreaders that consist of one block in the middle, with four threaded rods coming out from each side, two to the neck and tail blocks and two to the waist. But then I still wanted to clamp the upper and lower bouts, and that might be a bit tricky.

So here's what I finally came up with; I found I didn't need the neck and tail block spreader, after all.


Well, that's it for today.....I'm all tuckered out.


Previous Page

Next Page