Finishing and Gluing the Fingerboard / Peghead Inlay
(Oh, yeah...I had a near-miss with this fingerboard. I had used an awl to punch a small hole for the side dots, totally forgetting how brittle ebony can be — resulting in a crack of about 1-1/2" inches — luckily, only in the side and bottom. Yikes!!! But I recovered, dribbled superglue into the crack, and clamped the fingerboard down really tightly. After it was sanded down, the crack totally disappeared. Saved!!! I won't be doing that again, that's for sure....)
|
|
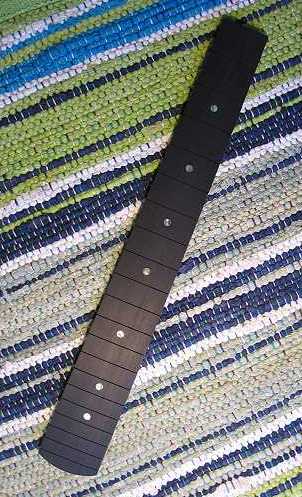
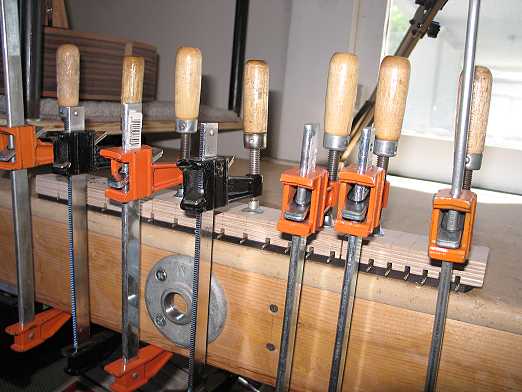
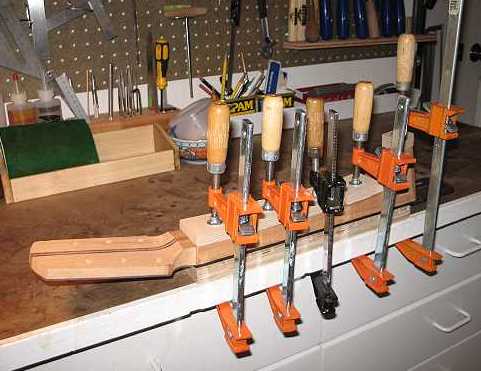
Saturday through Sunday, August 2nd through 4th: In these three days, I worked on the fingerboard, getting it ready to glue onto the neck. I first installed the fingerboard position dots (and the side dots). The photo to the left is not actually the final product — after I installed these 1/4" paua dots, I realized I hadn't done what I usually do, which is to install double dots at the 5th and 12th frets. (I like having those positions marked differently, for easier locating when playing.) After trying different combinations of dots, what I did was to put some tiny 5/64" paua dots on each side of the big dot; larger dots on both sides made it look too heavy. Next I pressed my frets in, using a fret press caul in my drill press. What I do is to put some Titebond on the fret tang and then press the fret in with the caul. Installing the frets before gluing the fingerboard to the neck creates a tiny bit of backbow in the fingerboard, so what I always do is to clamp the fingerboard straight, as seen below.
|
|
|
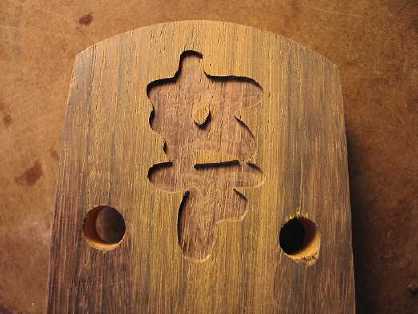
Now it was time to work on the peghead inlay. I am doing the same "Matsushita" kanji inlay that I've done on a ukulele and the last Taylor-style cutaway. I first spent a few hours sawing out the inlay of some mother of pearl I had. Then I routed out the cavity that will surround the inlay. (I will fill those surrounding areas with black epoxy; I found that doing it this way makes the inlay stand out more strikingly in the rosewood peghead....and it's much easier than trying to rout out the exact shapes of these inlay pieces!!!)
|
|
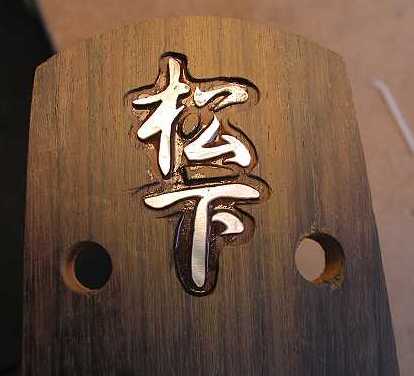
Next, I superglued the inlay pieces into the cavity.
|
Ta da!!!! HERE'S THE BEAUTIFUL FINAL INLAY!! NOT!!!!! (Fooled you, didn't I?) Here's what it looks like now — I've covered the inlay with the epoxy tinted with black. Tomorrow I will scrape and sand it all down, and it will look lovely (hopefully!).
|

While the epoxy was curing, I turned my attention to the truss rod. I am using Allied Lutherie's truss rod. You rout a .40" deep slot, install the truss rod, and epoxy and clamp a 3/16" deep filler strip on top of the truss rod. The filler strip will press down on the rod, eliminating truss rod rattle and making the rod work more efficiently. Here I am clamping it down. Later I planed and scraped the filler strip flush with the top of the neck.
|
|
Here's where I'm at now. I have glued the fingerboard to the neck with Titebond. What I do is use a staple gun to shoot two staples at both ends of the underside of the fingerboard, then clip each staple so there are two prongs sticking out. When I position the fingerboard on the neck, the staples dig into the neck, thus keeping the fingerboard in position when it comes time to glue it. Underneath the fingerboard is a slotted caul.
|
TOMORROW.... Carving the neck — one of my favorite parts!!!
Previous PageNext Page |
