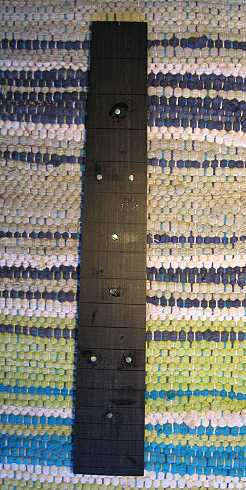
Thursday, July 16th, 2009: I got a very late start today — I had to spend about three hours at school, packing up and marking a bunch of my teaching supplies for moving to another room. I didn't find out until this morning that I needed to do that, if I didn't want all my things thrown in the trash! (The school is clearing out and remodeling the workroom I've been in for many, many years; luckily, I was offered a tiny little office room, so I could still have my little "home away from home," separate from my classroom.) It was probably a good thing — it's amazing how much junk you accumulate throughout the years — it provided a good opportunity for me to pare down my teaching supplies. So, I didn't really do a lot on the guitar today. One thing I did was to glue in the 4mm paua abalone dots in my fingerboard. Below is a photo taken right after I glued them in. I haven't sanded them down yet.
|
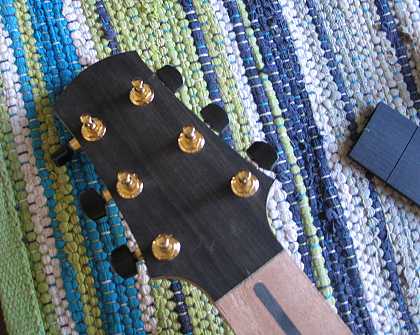
I also drilled the holes in the peghead for the tuners (I have the gold Schaller mini-tuners, which I replaced with ebony tuner buttons). After I drilled the holes, I thinned the peghead to around 1/2" thick.
The final thing I did today was to decide what kind of inlay I'd put on the peghead. At first I was going to do the same "Matsushita" kanji inlay that I've done on my recent guitars. But (1) there wasn't really that much room on the peghead at the top to arrange the 2-character kanji very aesthetically, and (2) I kind of wanted to try something simpler (I didn't really feel like cutting out all those tiny pieces this time) and different. So, after playing around with my initials a lot of different ways, I came up with this:
In case you can't tell, it's just a "K" and an "M". (Actually, if I put a dot over the right part of the "M," it would look like it said "ki," which is the Japanese word for "tree" — and my name means "under the pine tree". But I thought that might confuse people, and it's not really representing my name by saying just "tree." So I think I'm abandoning the dot idea.) Tomorrow I'll see what kind of abalone scraps I've got, and I'll do the inlay. After that, I can glue the fingerboard on the neck and get on to the neck-carving. |
|||||||||||
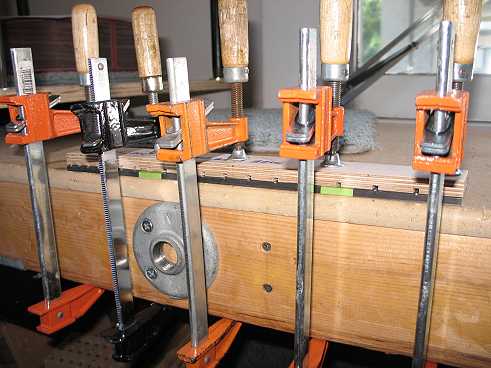
Friday, July 17th, 2009: Not many pictures yet today. I had a little bit of frustration this morning, after I had sanded the paua fingerboard dots down and proceeded to fret the fingerboard. (Before I started the fretting, I first drilled two 1/16" holes in the fingerboard, at the 3rd and 11th frets, so I could use the drill bits as locating pins, so that later, when I glue the fingerboard, it will not slide around.) Anyway, the frustration came because, for some reason, the fretwire I was using just would not seat down into the fret slot, even if I kept on pounding away at it with my deadblow hammer. (The method I use is pressing the frets in with a drill press fret caul, and usually the fretwire just easily "clicks" into place with a little pressure.) This time, though, the fretwire just wouldn't go in. I don't know if I had the wrong fretwire (though I bought this fretwire to go with the slotted fingerboard, and Stew-Mac says all their fretwire fits a .023" slot), or if the slots in this fingerboard were a bit narrower than usual. At any rate, I tried some older leftover fretwire I had, and it fit just fine. I still don't quite know what the problem was, but it's solved now, thank goodness. I got all the frets in. After that was done, I clipped the fret ends flush to the fingerboard edge. Then I discovered I didn't have my old Size 5 fingerboard clamping caul anywhere (it seems to have mysteriously disappeared). So I spent some time making a new one with some scrap plywood I had lying around. |
Here I have clamped the fingerboard with the caul, to straighten out the slight backbow that happens when I fret the fingerboard:
While this is clamped, I will start working on the peghead inlay — I will cut out the KM logo from some abalone or pearl I have.
|
|
||||||||||
|
|