On to the Shellac Seal Coats and Finishing!!!


Friday, July 27th through Sunday, July 29th, 2012:

It's Sunday afternoon right now. No photos. For the past few days, I have been dealing with the next step, which is laying on a couple of shellac seal coats, in preparation for the finishing. It hasn't gone as smoothly as I would have liked.

FRIDAY: The first thing I did was to level the fourth Z-poxy coat and wipe on a thinned (half Z-poxy/half alcohol) coat of Z-poxy. However, later that evening, I had to level that thinned coat down, because it hadn't gone on too smoothly and had ridges. Then I laid on another thinned coat, a little thinner this time, being more careful this time to wipe it on as smoothly I could.

SATURDAY: I removed the paper and tape from the top, and lightly scuffed the entire soundbox, to prepare it for the two shellac coats I would apply as a sealer, before the waterbase finish. There were, however, a few spots on the top that I decided to sand a bit, to remove some tiny blemishes and slight grain tear-out. The problem was, I had already applied shellac to the top (prior to doing the pore-filling), and, after I sanded those spots and applied a new coat of shellac, there was a bit of blotchiness (the sanded spots were a tad lighter in color as the rest).

I tried touching those spots up with more shellac, but that didn't work to even it all out. It seemed the only way to get it all even again would be to remove all the shellac and start over. First I considered sanding all the shellac off, but didn't think that would be a good idea, as my top was pretty thin already, and I didn't want to over-sand it.

SUNDAY: Then I read on some forums that you can remove shellac with alcohol, so that's what I just did this afternoon. I just took a gray Scotchbrite pad, sprinkled some alcohol on it, and scrubbed away, little by little, at the shellac on the top, immediately wiping the softened shellac off with a paper towel. It worked! It took a while to get all the shellac off, but I finally got it done, and the surface was once again evenly colored. Then I wiped some naptha over the entire soundbox, to clean it all up, and sprayed shellac on the top (I had already sprayed one coat of shellac on the back and sides Saturday). Right now, it's sitting outside drying. Later today, I will spray another coat of shellac on the whole body.

Oh, yeah....I had no problems with the neck, with either the pore-filling or the shellac, so that's a plus.


Okay...I lied...I just couldn't resist taking some photos..mainly.because I'm so happy everything has turned out okay with this shellac business! (And I'd like you to see how the colors all turned out.)


INDEX:

Return to HOME PAGE

  1. Working on the Top and Back
  2. Finishing the Rosette, Harpbox Peghead Veneer
  3. Bracing
  4. Carving the Braces
  5. Bending the Sides
  6. Neck and Tail Blocks
  7. Pegheads & Top Kerfing
  8. Profiling the Sides for the Back
  9. Soundport and Side Reinforcements
  10. Gluing on the Top
  11. Gluing on the Back
  12. Trimming Overhang & Harpbox Peghead
  13. Routing for Binding
  14. End Wedge & Binding
  15. Scraping the Binding, Binding the Harpbox Peghead
  16. The Box is Done --- On to the Neck!!!
  17. Working on the Neck & Fingerboard
  18. The Neck is Finished!!! Now to the Bridge!!!
  19. Peghead Inlay, Final Sanding & Pore-Filling
  20. Shellac Seal Coats and Finishing!!!
  21. Finishing the Finish!!!
  22. The Final Steps
  23. It is Finished!!!


A view of the end wedge (I just love the contrast between the rosewood and the bloodwood!) --- sorry, it looks a little distorted because of the camera angle!


TOMORROW: I will start the waterbase finishing process (Target Coating's EM6000).


Monday, July 30th, 2012:

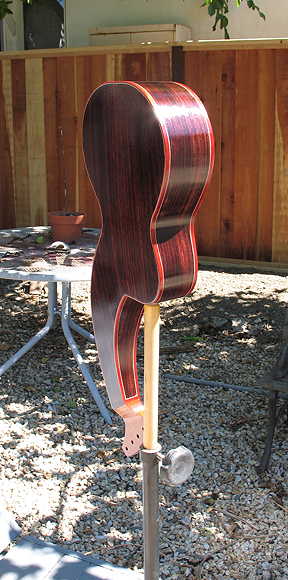
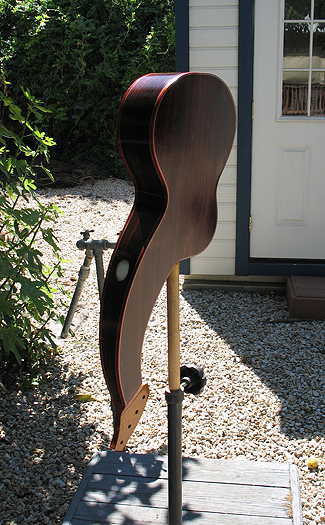
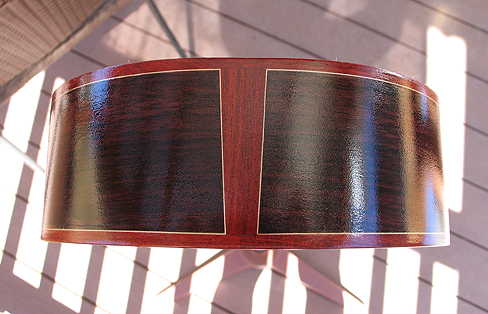
A couple of quick photos, as I wait to lay on the second coat. It's 10:10 a.m., and I have just finished spraying the first coat of the EM6000 waterbase finish. At first, I was having problems getting the proper atomization of the spray out of the gun, until I brightly discovered that all it was, was that the air holes in the cap had old finish residue on the sides of the holes. Once I removed that residue, all was fine. Such simple solutions, huh?

What I do is spray a couple of very light coats. When it first goes on, it looks kind of dry and pebbly, but then, in a few minutes, it all smooths out and becomes more satiny, as you can see here. I stay away from shooting any heavy coats, because, for me, they tend to develop sags and runs, which are a pain to fix. After each spraying session, I take the gun inside, empty the container, rinse it out and partially fill it with hot water. Then I take it back outside, hook it up again, and spray the hot water through the gun, finishing it up by just shooting air through the gun. Then I take it back inside and clean the cap, making sure there are no clogs. That might be overkill (but it really doesn't take long at all), but, for me, that seems to ensure smoother spraying.

I plan to follow about the same finishing schedule as I did last summer (look HERE), so in about an hour, I will spray another coat, hopefully doing about four or five coats total for today. Here's what it looks like with one coat so far:


Wednesday, August 1st, 2012:

No photos, as they'd just look like the ones to the left, only with more coats of finish on them!

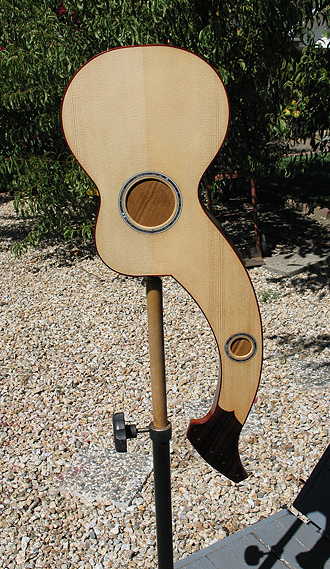
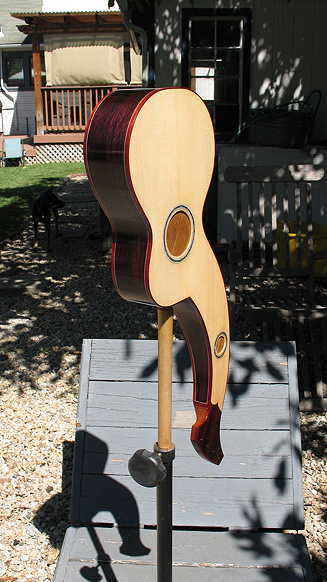
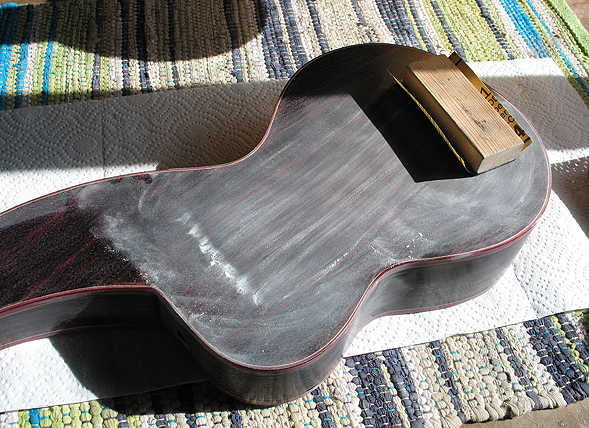
No, I take that back --- here's a photo of how nicely the EM6000 sands. This is a photo I took this morning, when I was doing the first level-sanding of the finish.

Here's what I've done so far on the finish:

  • Monday --- Four coats total, about an hour or so apart.
  • Tuesday --- Five coats total.
  • Wednesday --- Level-sand, and spray four coats.

I'm not sure just how many coats I will put on --- I'm thinking at least three more tomorrow, making a total of sixteen coats. We'll see how it goes.

Friday, August 3rd, 2012:

  • Thursday --- Five coats. (That's the last session --- for a total of 18 coats.)

Today (Friday) I am doing some drop fills, mainly in the rosettes (I always seem to have sunken spots there).

I am going to let the instrument sit now, for at least a week (if I can stand the waiting), before leveling it again and doing the final polishing and buffing. This is the most difficult time for me, because I am always so anxious to see how it's all going to look and sound!

See you in a couple of weeks. . . . .


Go to Previous Page


Go to Next Page