Peghead Inlay, Final Sanding, & Pore-Filling


Saturday, July 21st, 2012:

Just a few photos today. Today I spent until around 3:00 p.m. planning and gathering items to try an idea I had late last night for my peghead inlay. It somehow got into my head to try to do my initials in the same reddish epoxy, outlined with aluminum, that I did with the fingerboard dots. The tricky thing to figure out was what materials I could use to do the outline. I looked in craft stores for some flat aluminum wire I had read about online, but couldn't find any. Then I bought some aluminum flashing that I could cut into thin strips, and I tried to use that to form an outline in a routed out cavity, and then fill it with the colored epoxy.

Well, it kind of worked, but it was really difficult to get the aluminum strip to make nice, smooth bends, to form the letters ("KM") I wanted. After a while, I decided I would never be able to make it look really nice, so I decided to go with my original plan, which was to make a simple "KM" inlay with mother of pearl, as I did on my latest Size 5 guitar.

Anyway, here's how my first experiment with the aluminum outlining came out:


So...I didn't actually get started on the inlay until around 3:30 p.m. It took me about an hour or so to saw out the inlay. Here it is, just laid on top of the peghead at its approximate position:


Then I spent about an hour or so routing out the cavity with my Dremel, and then gluing it in with epoxy mixed with ebony dust. Here's what it looks like at the moment (lovely, huh?):

Sunday: A quick photo of it sanded down (the little white specks are specks of Kleenex --- I had dampened a Kleenex to slightly wet the surface so you could see the contrast better):

Tomorrow, it will be time to do the final sanding of the harp ukulele soundbox and neck, and move on to the pore-filling!!


INDEX:

Return to HOME PAGE

  1. Working on the Top and Back
  2. Finishing the Rosette, Harpbox Peghead Veneer
  3. Bracing
  4. Carving the Braces
  5. Bending the Sides
  6. Neck and Tail Blocks
  7. Pegheads & Top Kerfing
  8. Profiling the Sides for the Back
  9. Soundport and Side Reinforcements
  10. Gluing on the Top
  11. Gluing on the Back
  12. Trimming Overhang & Harpbox Peghead
  13. Routing for Binding
  14. End Wedge & Binding
  15. Scraping the Binding, Binding the Harpbox Peghead
  16. The Box is Done --- On to the Neck!!!
  17. Working on the Neck & Fingerboard
  18. The Neck is Finished!!! Now to the Bridge!!!
  19. Peghead Inlay, Final Sanding & Pore-Filling
  20. Shellac Seal Coats and Finishing!!!
  21. Finishing the Finish!!!
  22. The Final Steps
  23. It is Finished!!!

Tuesday, July 24th, 2012:

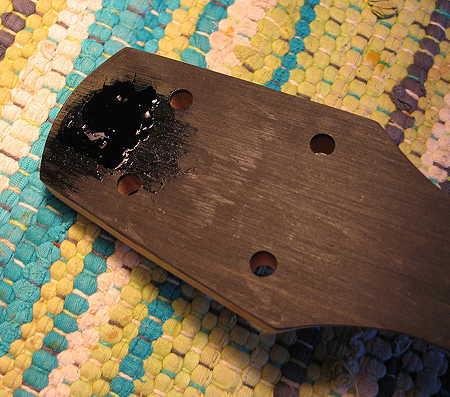
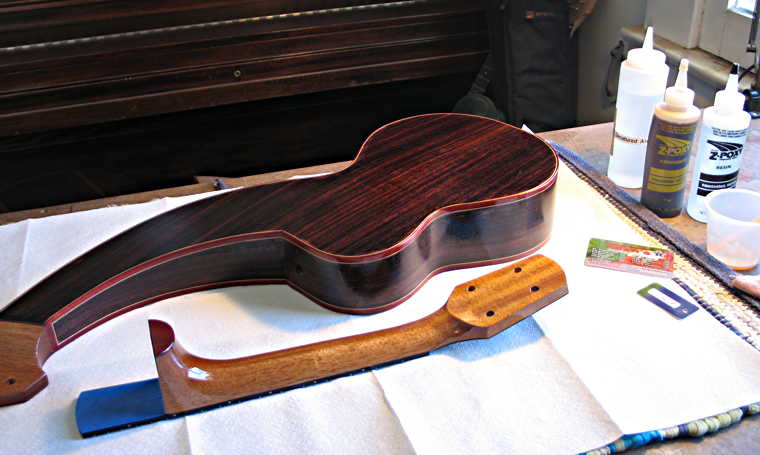
Only one photo today --- here's what I did yesterday and today:

Yesterday, I spent a few hours doing the final scraping and sanding of the uke, using first 150 grit, and then 220 grit, sandpaper. Then I sprayed (with a Pre-Val sprayer) a coat of shellac (Zinsser Seal-Coat) on the top, waited till it dried a bit, and then covered the top with some paper & masking tape. I also taped up the fingerboard surface (such a tedious job!).

Then I put on the first coat of Z-poxy for the pore fill. I had these little tiny credit card-like things, so I used that, and, for the larger areas, I used a regular credit card (it wasn't actually a credit card, but an old fund-raising discount card I had lying around). One thing I found was that, if I curved the card as I scraped, it would conform better to the curved areas (such as the side bouts). Also, I actually did a lot of the sides with my gloved fingers, because it was easier to get it smooth that way on the curved sides.

This morning I level-sanded (not down to wood, though) the Z-poxy with some 320-grit sandpaper and put on another coat of the Z-poxy. There it sits now (to the right). I might, later tonight, see if I can level-sand this coat, and see whether or not I will need a third coat, to fully fill the pores. (Usually I do need three coats.)

Wednesday, July 25th, 2012:

Level-sanded the second coat, and put on a third coat of the Z-poxy. Will level-sand that one tomorrow.

Thursday, July 26th, 2012:

Turns out I needed a fourth coat of the Z-poxy, to fully fill the pores. So, that's what I put on today.


Go to Previous Page


Go to Next Page