Soundhole Decisions!!!!
Saturday, July 10th, 2010: I didn't really accomplish any actual physical tasks today; today was just a day of researching and making final decisions about the soundhole for this instrument. The first decision I had to make was whether or not to attempt an oval soundhole for this Kasha-style uke. The Hanalima plans have an oval bound soundhole, which looks very nice and fits the design nicely. However, #1, I have never done an oval soundhole, and, #2, I have never done a bound soundhole, so just how to go about doing both was a mystery to me! I went online and downloaded a bunch of building forum messages on the subject. Some suggested cutting out the oval hole with a coping saw, or drilling holes with the drill press and finishing it up with a spindle sander. Others suggested making a template and using router collars or a flush-cut bit. I didn't have as much of a problem with the idea of cutting out the oval soundhole, as I did with how to produce a matching soundhole binding (so the rim of the soundhole is bound). I then went to a craft store to take a look at an oval mat cutter, which I had seen someone mention in one of the forums. The problem with that is, you can only adjust the narrow diameter (and the smallest you can make it is 2-1/2"); you cannot vary the long diameter. This wouldn't work for the size soundhole I'd need. And the mat cutter will only score the hole; it can't really cut it into the wood. I then came home and figured, okay, supposing I could cut an oval soundhole, could I then bend the bloodwood binding I plan to use to fit the soundhole rim? I first tried bending it on my electric bender and didn't have any success with that; the binding just kept cracking on me. Then I tried boiling the binding; that didn't work, either. Even after two hours of boiling in water, the binding just would not become any more pliable than it did by hand. |
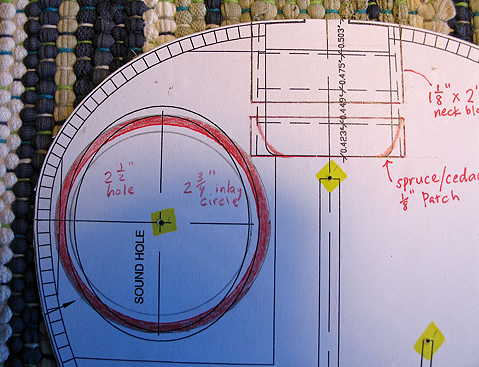
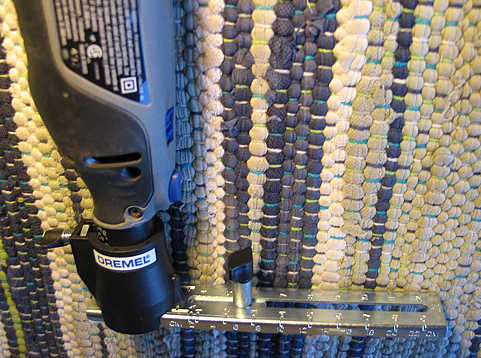
So, by then, I had pretty much decided I might abandon the oval soundhole idea. Next, I looked into just doing a round soundhole, with a bloodwood rim. Basically, I'd just cut out a bloodwood ring with my circle cutter, making the inner edge of the ring overhang the soundhole diameter by a bit, say, 1/8" or so. Then I'd inlay it into the top. Then I just cut out the soundhole. The edge of the soundhole would then be the bloodwood. Much simpler! I figured I'd want my soundhole to be about 2-1/2" in diameter. So, I went to my Stew-Mac circle cutter jig for the Dremel and discovered that the smallest diameter hole I could do with that was 3"! Rats! So, next I remembered that I had made a little plexiglass jig to cut a smaller diameter hole a long time ago when I first started making ukuleles, so I pulled that out. I would just need to make another pivot hole in it to be able to make the bloodwood ring. Then I remembered that, in a Dremel set that I had gotten when I got the Dremel 400, there was a circle cutter!!! (I was so used to using my Stew-Mac circle cutter, that I hadn't ever pulled out the Dremel one.) I took a look at it and, lo and behold, it is able to cut circles anywhere from 3/4" diameter up to 12"!!!! Perfect! It looks sturdily made (much better than the older Dremel attachments I had used long ago, like the Dremel router base). So.....I have finally come to my decision! I will stick with a round soundhole, with about an 1/8" bloodwood rim. I have drawn it up on the plan, to see how it will look, and it looks okay. I have drawn in red the proposed soundhole. I think I may move it over, though, a bit to the right, so it won't be so close to the binding edge of the top. I may curve the bottom corners of the fingerboard, also, to make it all fit better and look more balanced. What a day. But my mission was accomplished!!! |
|
Here's the change I will make to the soundhole. I plan to move the soundhole a little bit more to the right (say, about 1/8"), so it will be a little bit further away from the outer edge of the top. |
Here's a close-up of the soundhole change. |
Here's the Dremel circle-cutter attachment. |
||
Previous Page |
|
Next Page |