The Neck is Carved! Finish Sanding, Wash Coat, Filling, Sanding, Sealing, Tru-Oil!!!
Monday, August 2nd, 2010: Today I didn't get a chance to work on the ukulele until around 2:00 p.m., as I had to spend the morning at school moving the contents of my little "office" space to another room. (I have a desk & bookshelf setup away from my classroom, so I can have closer access to the villa offices and equipment when I'm not actually teaching in my classroom.) I had to move to a different spot because Special Ed was taking over the office space I had been using. Anyway, I don't have many pictures today, as, again, I was spending all my time working on the uke. I first carved the neck and glued on the bloodwood heel cap:
|
|
Next, I did all the finish sanding, grain-raising between the 120, 150, and 220 grits. (I have decided not to do a peghead inlay this time, preferring to keep this design as simple as possible.) Finally, I just finished applying a shellac wash coat before I fill the pores tomorrow (maybe — I have an old college friend visiting for the next few days, so I may not be able to get back to the uke for a while).
|
|
|

|
||||
Wednesday, August 4th, 2010: It's about 8:00 p.m. on Wednesday, and I've been having a wonderful visit with an old college roommate, visiting from Massachusetts! However, I've also managed to do the pore-filling on my uke. I had decided to do a waterbased pore filler, but didn't realize till Tuesday that I didn't have any left. I thought I had either the Stew-Mac or Target Coatings pore filler in my closet, but couldn't find it anywhere! So, before my guest came, I was able to make a trip up to the nearest Woodcraft (about half an hour away), and I bought some Behlen's waterbased grain filler. They didn't have the neutral color in stock, so I got some mahogany color. I used it straight on the mahogany neck, and just added some brown and black TransTint stains to color it darker for use on the rosewood back and sides. (I had decided to use the waterbased filler instead of an oil-based filler — which is easier to use because it doesn't dry on you as quickly — primarily because I didn't want to wait the longer time that it would take the oil-based filler to dry before I could start the Tru-Oil process.) I just put what I think will be the last coat of the pore filler, and I will sand that coat down tomorrow to see what I've got. I think all the pores will be filled this time. It's taken about 5 applications of the pore filler. The best way I found to apply it was to brush it on with the grain with a foam brush, then immediately (it dries super-fast) wipe it off, with a firm, even stroke across the grain, or at a 45-degree angle, to remove the excess and push it into the pores. To do that, I used a paper towel folded up many times, so I had about a 3" square piece of paper towel. After every stroke across the grain, I would go to a new, clean section of the paper towel. That way, there was less chance of the paper pulling filler out of the pores again. I would rub as much of the excess off as I could with dry sections of the paper towel. I would then wait at least an hour (longer is better, actually) before I would sand whatever excess was left off with 220-grit sandpaper. If the pores were not completely filled, I just repeated the process. I'm hoping that tomorrow, after I sand it, all the pores will have been filled and I can apply a seal coat of shellac, sand that down, and begin the Tru-Oil process! Stay tuned. Thursday, August 5th, 2010: It's about 11:30 a.m. right now. I spent about an hour doing the final, final sanding after my final pore-filling application. I sanded everything down to a 600-grit finish — from 220 to 320 to 400 to 600. On the soundbox, I have just finished brushing on a final seal coat of a 2-pound cut shellac (Zinsser's Seal Coat) on the back and sides. On the top, prior to the pore-filling, I had already applied a wash-coat of shellac; I now sanded that smooth and then applied another coat of shellac. When these coats are dry, I will sand it all down to 600-grit, and then the soundbox will be ready for the Tru-Oil applications. While the shellac is drying on the soundbox, I am now applying the first coat of Tru-Oil to the neck (no shellac sealer coat here) and peghead. What I am doing is just wiping the Tru-Oil on with some old cotton T-shirt material, then immediately wiping the excess off. After a few hours, I will lightly smooth it with some 0000 steel wool and then repeat the process, doing only 2 or 3 coats per day until the finish is where I want it. |
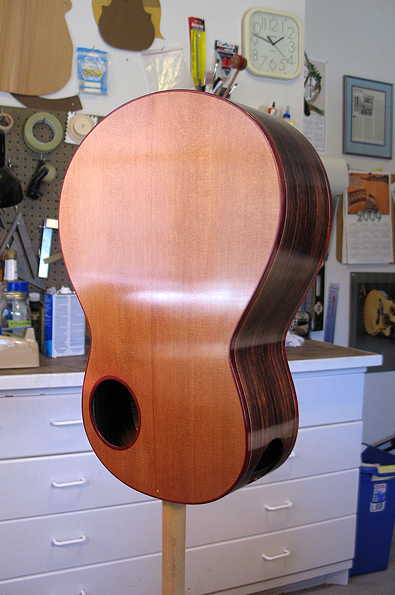
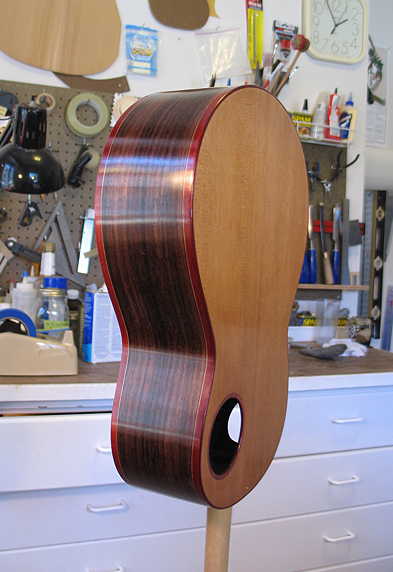
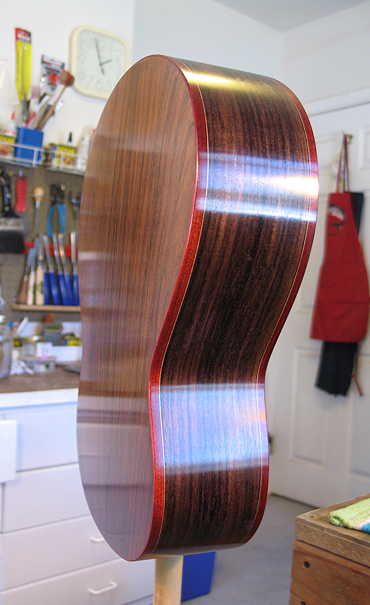
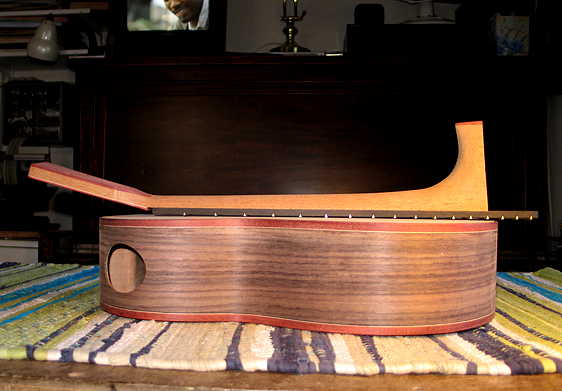
Saturday, August 7th, 2010: A few quick photos of where I'm at now. . . I've put on 7 coats of the Tru-Oil so far, and I'm loving it! It is SO easy to apply, especially on such a small instrument. It is going on so smoothly and thinly (I think my very careful sanding down to 600-grit smoothness made a big difference in how easy it is to apply and wipe off). I'm not sure how many coats I'll end up putting on; I would like it to be a glossy finish, and with each application it is developing a nicer and nicer sheen. We'll see.
Sunday, August 8th, 2010: I'm now on my 10th coat of Tru-Oil, and IT'S LOOKIN' GOOD.... I've just discovered something new — COFFEE FILTERS!!!! Up to now, I have been applying the Tru-Oil with a small piece of old T-shirt, folded several times into a small square; then, I immediately have been wiping it off with a fresh piece of T-shirt. Well, after seeing a tip on some forum on using Tru-Oil, I decided to try this tip: one poster said she had wiped off and buffed the applied coat with a coffee filter, instead of cloth. I just tried it, and it works better than using the T-shirt material (for the wiping-off process only)! With the T-shirt material, it tended to drag a little as I tried to wipe it smoothly across the Tru-oiled surface. With the coffee filter, it doesn't drag. I can just lay my hand over the whole surface of the coffee filter, and it is much easier to press down harder and kind of "buff" the surface more evenly. The filter also absorbs the excess oil as I'm buffing the finish with the filter. It doesn't drag or stick to the surface. So, from this point on, I'm using the coffee filter!!!! I'm thinking, only a few more coats, and I'll be done. Then the most difficult part will be here . . . the waiting for the finish to fully cure before the final polishing. |
|
||
Wednesday, August 11th, 2010: Just an update on my progress with the uke....After about 10 coats of the Tru-Oil, on Monday, I was trying to repair a little nick in the finish on the soundboard; however, in doing so, I managed to make it worse (sanded through the shellac in that spot). So, I ended up completely sanding off the finish on the soundboard, re-shellacking (is that a word?) it, and re-applying the Tru-Oil on the soundboard. It's gone well. I found that, if I put the uke in the backyard out in the sun, it dries more quickly, and I have been able to put more coats on per day. My coats being so thin (I nearly wipe it all off after I've applied it), I've been able to put on 4-5 coats per day. So, I've just finished the 10th coat on the top. Tomorrow, I'll put 2 or 3 more coats on the whole thing (back, sides, top), and it will be done. I plan to wait at least 2-3 weeks before I touch the uke again, to do the final polishing, bridge-gluing, nut and saddle-making, fret-dressing, and final set-up. School starts this coming Monday, so I'll have plenty to keep me busy till then (though it will still kill me to wait to find out how it will finally sound!). So....check back on the site after Labor Day weekend...it may be finished then!!! |
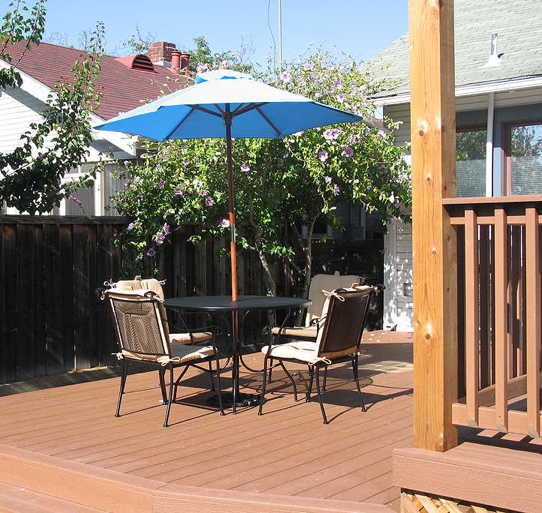
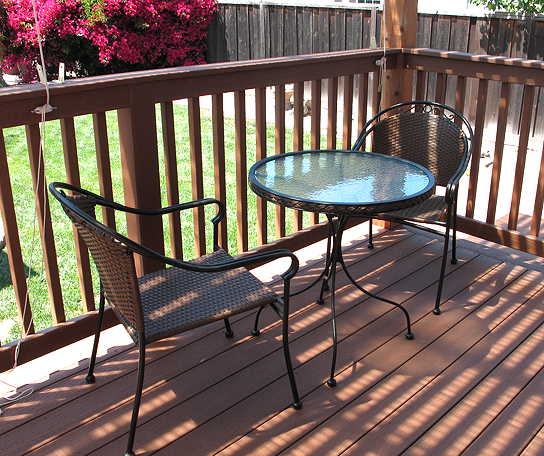
In the meantime, here are a few photos of the latest deck developments. Here's the patio set I got a great deal on:
|
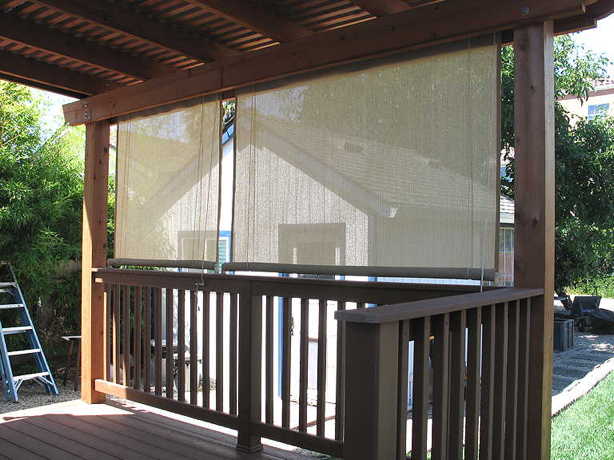
I put up these roll-up sun shades yesterday. In the late afternoon, the sun is low, and these shades help block that late afternoon sun.
|
||
Later that day . . . . Here's a video to show you more of the Tru-Oil finish:
|
Okay, here it is — my cute little bistro table and chairs!!! It was just delivered today (Friday).
|
One last thing.....the Great Kaplan plays a 2-string, held-together-with-duct tape ukulele (maybe we place too much emphasis on how beautiful an instrument looks!): |
||
Previous Page |
Next Page |