My Summer 2000 Project: Building A Mandolin

  1. The Mold
  2. Bending the Sides and Gluing the Rim
  3. Carving the Top
  4. Kerfing, Tone Bars, Gluing the Top
  5. Making the Neck
  6. The Peghead
  7. Inlaying the Peghead
  8. The Fingerboard: Inlay, Binding, Frets
  9. Gluing the Neck
  10. The Back
  11. Gluing the Back
  12. Routing for Binding
  13. Binding
  14. Scraping the Binding
  15. The Fretboard Extender
  16. Gluing the Fingerboard
  17. Sunbursting
  18. Final Scraping
  19. Finishing
  20. Making the Pickguard
  21. It's Finished!!!

The Mold

Well, I felt like doing something really different this summer. I have decided to try my hand at building a mandolin! I know next-to-nothing about mandolins; I've never played one, nor have I ever built one. But over a year ago, I had bought that book by Roger Siminoff, Constructing A Bluegrass Mandolin , so I figured now was a good time to try it!

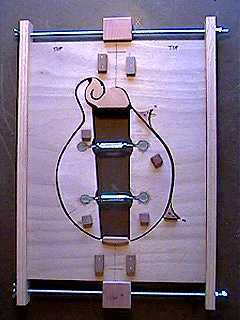
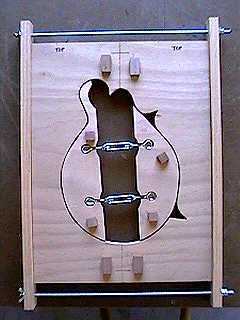
June 19th...I started working on the mold yesterday. I finished it today. To the right is a photo. The mold is made of 3/4" plywood. The two halves of the mold come apart. They are clamped together with some 5/16" threaded rod, which is run through the 1-3/4" wood strips screwed to the mold. Those little wood blocks you see (they're on the other side, too) help support the mold, so that it sits above the table surface. Turnbuckles are used to spread the clamping cauls. They will press the sides, after I have bent them, against the walls of the mold.


June 22nd....Well, to the left you see the second stage of my mold. I realized I had forgotten to provide a way to clamp the head and end blocks (when that time comes). The space between the threaded rod and the mold wasn't wide enough for a clamp jaw, so I drilled a hole in a block of wood, so it could be positioned at the end of the mold. I can then use that wood block as a clamping caul when I need to glue on the blocks.

Here are the head and end blocks, along with the two point blocks. I glued together two 3/4" scrap boards of mahogany and then sanded it down to 1-7/16" thick. Then I used my bandsaw to cut the pieces. I thought the scroll in the head block would be difficult to cut, but it wasn't! (It was actually kind of fun to do.)


Go to Next Page....Bending the Sides and Gluing the Rim

Return to Projects Home Page