 |
 |
|
 |
|
|
|
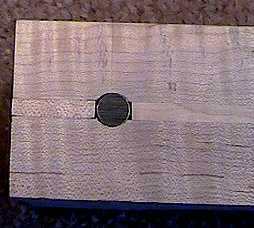
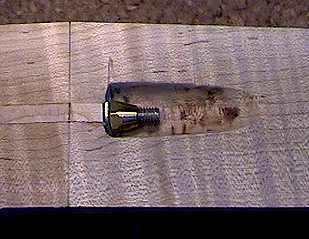
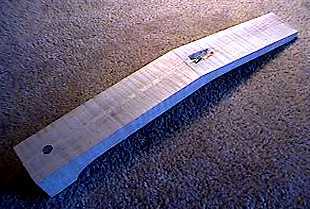
July 4th.... Well, I feel really good right now. I had a productive day. No mistakes so far! (For me, that's rare.) I cut the neck out of the 2" by 3" curly maple blank I got from Stew-Mac. It was wonderful using my new bandsaw (I just took the plunge and bought a 14" Delta bandsaw) to do it! I used the 1/4" blade that came with the saw, and it cuts so accurately, compared to my old benchtop bandsaw. I love it. After I cut the neck, I also cut the peghead ears from the leftover scrap. Then I deviated from Simonoff's instructions --- for some reason, he does the truss rod routing AFTER he glues on the peghead ears and does the shaping of the neck. To me, that didn't make much sense. It seems it'd be a lot harder to rout an accurate slot that way. Anyway, I routed the truss rod slot next. I had to go to Orchard Supply and get a 3/16" router bit --- the Stew-Mac mandolin truss rod I got needed a 3/16" wide slot. The truss rod has a barrel bolt welded to one end of the 3/16" rod, and the adjusting nut and washer at the other end. I looked all over for a 3/16" router bit, and the only one I could find was a "veining" bit -- it routs out a rounded bottom, which is fine for the truss rod. The only thing I was worried about was that its cutting blade wasn't deep enough before the bit flared out wider than 3/16". I needed to rout a 7/16" deep slot. The router bit JUST made it; it was able to reach down to the 7/16" depth I needed. Lucky me! I had great luck this time -- my slot was perfectly centered in the neck (sometimes my truss rod slots haven't been that accurate!). So far, so good. Next, I had to drill a 3/8" hole 5/8" deep for the barrel nut to sit in. That went fine. Then I had to cut out a 1/2" diameter cavity for the adjusting nut and washer to sit in, at the peghead end, so a 5/16" socket could reach in there. That took some time. I used a little gouge and some grinding stones on my Dremel to make that cavity. I've never had to do a truss rod that adjusts at the peghead before --- all my guitars adjust from through the soundhole. Finally, that was done. Still, so far, so good.... Next I made little filler strips and glued those in, to set on top of the truss rod and at the heel end, after the barrel bolt. Oh, yeah, before I did that, I encased the truss rod in a plastic straw. I remembered I had read about someone doing that before, to cushion the rod and also to make sure glue didn't get on the rod or threads. Now the neck is clamped down, until the filler strips dry and I can scrape them level with the fingerboard surface. I'd say it was a successful day! I'm a happy camper. |
|
|
|
|
|