Finishing!!!!
Friday, July 28:
After grain-raising (two times) and completely sanding the soundbox and neck, it was time to start the finishing process. This time I decided to use a Preval spraygun to spray on the shellac sealer (Zinsser SealCoat, which is a 2-pound cut dewaxed shellac), because I didn't feel like pulling out the compressor and spraygun outfit yet for this tiny step. I sprayed a coat of the shellac and then filled the pores of the back, side, and neck with Target's HSF (High Solids Filler) 5100, which is a waterbase pore filler. (I still don't like using it as much as the oil-based paste filler, because it's more difficult to sand off; however, I do like it because you don't have to wait the four days I have to wait with the oil-based filler, before you can start the finishing process.) After the filler was dry, I sanded it and sprayed on two coats of the shellac, to have a good base for the Target USL waterbase finish I'll be using.
I hadn't used the Preval sprayers since I first began making guitars (this was over ten years ago); on my first few guitars, I either brushed on the nitro lacquer I was using then, or used the Preval sprayer. I had forgotten what it was like to use the Preval sprayer. It worked extremely well for spraying on the shellac sealer coats. I highly recommend it for those little jobs you might have, if you don't have or don't want to pull out the compressor.
|
|
 |
|
|
|
Saturday, July 29:
I live in California, and it's been super-hot these last couple of weeks — in the 90's and 100's. Thus, I was a bit worried about how my finishing process would go, if the weather didn't break. Well, I lucked out — today the weather is at 75° (at the moment, around 11:00 a.m.), and the humidity is around 57%. Not ideal, but not bad, either. Supposedly the weather is to remain in this range for the rest of this coming week. Perfect for me, as these are the days I will be doing my spraying!!!
Here is the Husky (Campbell-Hausfeld) HVLP spraygun I got at Home Depot a couple of years ago, with the Target Coatings' USL waterbase lacquer.
|
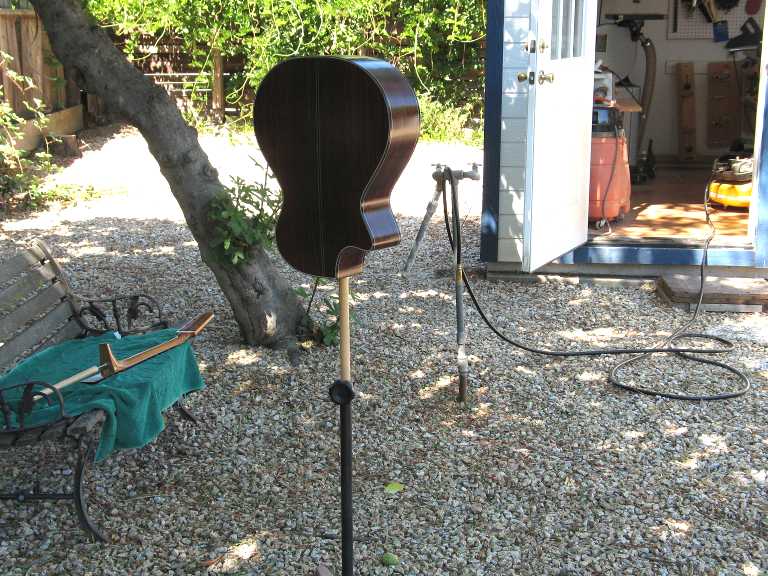
Here is my spraying station — my backyard under the shade of my fig tree! I have my little pancake compressor sitting in my little shed, and my guitar body clamped into my roller stand base. What you see here is the box after I have sprayed the very first coat. I don't actually spray it when it's on the stand; I hold it by the handle, so that I can be spraying with the surface pretty much horizontal, to prevent any possible runs, should I spray a bit too heavily. I sprayed it on light and even, to avoid the runs I tended to get because I used to spray it on too heavily. Lots of light coats will work out better than having to deal later with runs or sags in the finish! I will wait at least an hour between coats before I spray another.
Well, it's 5:30 p.m., Saturday, and I just finished putting on the fourth coat. That's all for today. I'll do three or four more coats tomorrow, and the same on Monday. Usually I end up putting on around 12 coats. We'll see. There were a few pores that hadn't gotten completely filled by the pore filler, so we'll see how long it takes for those to completely fill up. (Or maybe I'll see if I can drop-fill those pores later tonight, so I can sand them down before I spray again tomorrow.)
I had a successful spraying day today; it was the first time ever I didn't get ANY sags or runs!!! Either I'm getting better at setting the spray gun properly, or I'm getting better at my spraying technique, or it was just plain luck. I think a big part of it, however, was that I was much more conscious this time of spraying lighter, drier coats — in the past, I had thought that you needed to lay on a wet coat, as you do with lacquer. The USL levels out very nicely when you lay it on more thinly, actually.

|
|
|
|
Tuesday, August 1st:
Well, the spraying is finished. Here's how I did the spraying this time:
|
Saturday, July 29th |
|
Sprayed 4 coats of USL, 1 hour apart. |
| |
Sunday, July 30th |
|
Level-sanded with 320 & 400 grit gold paper, wiped with denatured alcohol, sprayed 3 coats of USL. |
| |
Monday, July 31st |
|
Level-sanded, wiped with denatured alcohol, sprayed 4 coats USL. |
| |
Tuesday, August 1st |
|
Level-sanded, wiped with denatured alcohol, sprayed 2 final coats USL. |
Now is the most difficult part of guitarmaking for me . . . . . .
WAITING for the finish to cure ! ! !
I plan to be very, very self-disciplined and a good girl — I will wait until August 14th before I do the wet-sanding and all the rest (gluing on the bridge, making the nut and saddle, leveling and dressing the frets, etc., etc., etc.). As it so happens, I do have something that will help me do that waiting — from this Friday through August 14th, I will be taking a CLAD class (to get certification to teach second language students) which our school district is offering. (Maybe it will keep my mind off the guitar.)
At any rate, you will not see any more updates on this project until after August 14th, so, until then, have a good end-of-summer!!!!!
WAITING....WAITING....WAITING....GOING CRAZY WAITING....
|
|
|
|
|