|
Even though classicals don't have fingerboard position or side dots, I decided to at least put in some side dots (so I can find the right places to play!!!). BUT.....all I had for dots was some leftover white plastic side dot material, which I didn't think would go too well with the color scheme of this guitar. I searched my house for any possible items to use, but couldn't really find anything. In the past, I have used some bamboo skewers for side dots, on a mahogany I built (which was kind of weird, because if you looked closely at the dots, you could see the bamboo cells). But I wanted some green side dots for this guitar. |
So, off I went to a party supplies store and then Walgreen's, to see if I could find something green and skinny and round to use. Various ideas crossed my mind --- colored toothpicks, maybe? Pick-Up-Sticks? Problem was, the only colored toothpicks I could find were square!!! Couldn't find any Pick-Up-Sticks (do they make them anymore?). Even considered buying some Rit dye and coloring the bamboo sticks.... Well, here's what I found.....a green plastic something-or-other,
which I located in the brushes and combs area -- 99 cents. It's
some sort of brush, I guess. But all I cared about was that it
had bright green, flexible This is, to me, a large part of the fun of making guitars --- that problem-solving aspect of it all. There's no end to the different ideas or solutions you come up with.... |
|
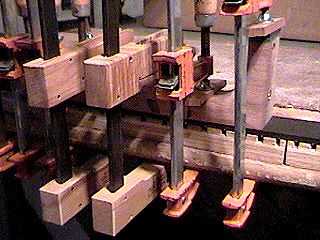
Here's how I ensure that the fingerboard doesn't slide around when I'm gluing it to the neck. I take a staple gun and staple in a few places on the underside of the fingerboard (between the frets). Then I use an end nipper to clip away most of the staple, leaving only some short nubs of staple. Then I position the fingerboard carefully on the neck surface and press it down into the neck. The staple nubs dig into the neck surface, making tiny holes. When I glue the fingerboard, the staple nubs in the holes keep the fingerboard from shifting on me. It works great. |
Here I'm gluing the fingerboard onto the neck. I have the fingerboard lying on a caul that has slots for the frets. |

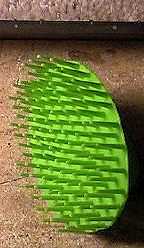 spines (or whatever they're called) that
were just about the right size for the dots!!!! And, as you can
see to the left, it worked. I just clipped off a spine, superglued
it into the hole I had drilled with the Dremel, and then clipped
the excess off.
spines (or whatever they're called) that
were just about the right size for the dots!!!! And, as you can
see to the left, it worked. I just clipped off a spine, superglued
it into the hole I had drilled with the Dremel, and then clipped
the excess off.
|
Here's the peghead yin-yang. I used the same veneer I've been using throughout the guitar. I printed up a yin-yang symbol from some clip art. Then I cut each half out of the green and blue, used a leather punch to punch out the holes, switched the holes to the other half, and superglued it all to another sheet of veneer on the back. I used the Dremel to rout out the circle, to the depth of the two pieces of veneer, and superglued the symbol in. When I scraped it flat, a little of the green color came off, but it kind of gives a bit of shading to it, don't you think???? |
Return to Projects Home Page |
