Time for a little visualization exercise...
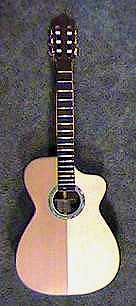
I couldn't wait. I just had to see what this weird little classical is going to look like. So, here I've bolted the neck on, laid the fingerboard atop the neckshaft (I haven't shaped the neckshaft yet), and put the tuners in the peghead (all temporarily, of course).
Just before this picture, I spent a day doing various things:
- I put the frets in the fingerboard. (I haven't filed or crowned them yet, though.)
- I set the neck angle and inserted the two threaded inserts in the heel.
- I made and glued the ebony heelcap (with some green/blue veneer, also).
So, this is approximately what the guitar is going to look like when it's done.
What's left to do?
Lots. The next things I'm going to do are:
- Figure out what kind of simple design I'd like to inlay on the peghead --- I'm considering a "yin-yang" symbol (to go along with my dual-wood top idea) in the blue and green veneer.
- Shape the neckshaft, after gluing the fingerboard on the neck.
- Make the ebony bridge --- this will take some time, as I have never made a classical bridge from scratch before!!!
- Do the finishing.
- Locate the bridge and make the nut and saddle.
- String 'er up ---- and see if this thing is going to sound good or not!!!!
Don't worry.....I'll be posting photos of those other things I just did (described to the left) soon.....Just felt like doing this visualizing activity first!