Building the Grand Concert
THE MOLD:
June 25, 1999.....I
built the mold today. I've made many different types of molds,
but this one was the easiest to do. I followed an idea from the
Lutherie Tools book (published by the Guild of American Luthiers)
this time.
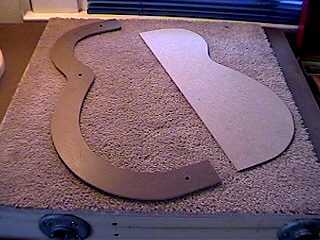
I first made a template strip of one half of the guitar
shape. I used tempered hardboard and drilled three indexing
holes in the template. Then, I traced the template four
times, onto 3/4" plywood, including the indexing holes.
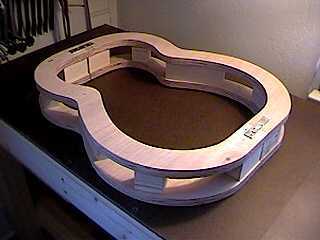
Next, I used a jigsaw (it doesn't bind, as my little bandsaw tends
to) to cut out the four pieces, about 1/16" outside the
traced lines. After drilling the corresponding indexing holes
in the plywood pieces, I then attached the template to one
of the pieces using dowel pins through the indexing holes.
I used a 1" carbide-tipped flush-cutting router bit with
a ball-bearing roller, to rout the plywood piece flush to the
template. I did the same to the other three pieces. It came
out great!!!! All four pieces came out exactly the same, and nice
and smooth! I had never had that kind of uniformity using my little
Delta 8" bandsaw.
After I had my four pieces, I glued and nailed ten 2"
tall spacer blocks in between the plywood pieces, again using
the indexing holes to line it all up correctly. Finally, I screwed
3" mending plates to join the two halves together.
When I need to remove the guitar body from the mold, I only need
to unscrew the mending plates.
| I'm still waiting for my supplies
for this guitar.....so it's a good opportunity for me to start
working on my side bending form. |
|