Sunday, August 12th, 2007:
I don't have a lot of photos for you today. I did do a lot of little tasks, but photos wouldn't really show you much for these things. Here's what I did today:
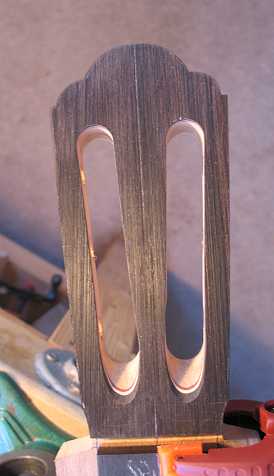
- I used a round file to form the ramps on the lower end of the peghead slots. (I do have a photo for this.)
- I sanded the slight (25') radius into the bottom of my bridge. (I did this now, so I wouldn't forget to do this later!) The way I did it was to put sandpaper on the top of my soundbox at the bridge location and sand the bridge on that.
- I drilled two teeny-tiny holes (with a couple of teeny-tiny drill bits I found in my Dremel box --- I think they were 1/32" bits) in the 1st and 11th fret slots, for indexing holes for fixing the fingerboard on the neck.
- I sanded the taper on the fingerboard surface, according to Cumpiano's suggestion in his book --- 1/32" lower on the bass side at the 12th fret, and 1/64" lower than that at the soundhole location. I used my sandpaper-covered 2-by-4 for this.
- I marked the location for my two threaded inserts onto the neck end. The way I do this is to cover the soundbox (where the bolt holes are) with tracing paper, mark the centerline, and rub pencil over the two bolt holes. Then, I flip the paper over when I tape it to the neck end, matching up the centerlines, and mark the centers of the two holes. I've found this method works the best for me.
- Finally, I marked my heel shape onto the stacked heel block of the neck and cut the rough neck shape out with my bandsaw. I bandsawed about 1/8" outside the lines.
TOMORROW, I will work on fitting the neck to the body, drilling the threaded insert holes, installing the inserts, and bolting it up to see how it all fits! Then it will be on to fretting the fingerboard (I do that before gluing it onto the neck) and later gluing it to the neck. After all that's done, I can carve the neck.
Who knows? I might get this thing done before Thursday night, when I head off to Santa Rosa for the Healdsburg Guitar Festival. That runs from Friday through Sunday. The reason I want to get this done before Healdsburg is that I really can't take time to work on the guitar after that, as I have school coming up on the 27th, and I really need to devote next week to planning for school!!!!
Since I'll have to be doing the finishing after school starts (and finding the time to do the whole waterbase lacquer method will be tougher then), I've been experimenting on scraps of my redwood and rosewood with something easier, yet still, I think, beautiful (I hope) --- Tru-Oil, which is really simple to apply, and something I can easily do each day once school gets underway. All you do (after pore-filling and some shellac coats) is "wipe on, wipe off" the Tru-Oil, one thin, thin coat per day, until you get the build you want. |
|
|
|
Do you see that tiny bulge on the left side of the right slot? Well, what happened was that, even though I had put masking tape on all the slots' sides, somehow, when I was using the round file to make the ramps, my file managed to make a little gouge on the bottom end of that slot on the left side. So, what I ended up doing was to kind of angle back the inner slot sides, to get rid of the gouge. The fronts of the slots are still the same, but the backs are a tiny bit wider.
(This photo was taken before I finished the repair.) |

So far, I've put about 6 coats on both the rosewood and the redwood, and I really like it! I like how it looks, how it feels (silky-smooth), and, especially, how easy it is to apply. I might end up using this for a finish. It seems to give a nice, warmer look to the wood, rather than a too-glossy lacquer look.
|
|
|